The Simple Scribe is the brainchild of Marty Crochet, a self‑employed carpenter who spent enough years scribing baseboard to wavy floors and fitting cabinet fillers to crooked walls that he decided the world needed a better mousetrap - or rather, a better scribing tool. What he created is a lightweight, molded plastic instrument that sells for $12.95 (less if you buy multiples), is made right here in the USA, and has quietly become a cult favorite among finish carpenters, cabinet installers, and remodelers who understand that a perfectly scribed line is the difference between a job that looks “pretty good” and one that looks like the trim grew there. And yet, despite its almost absurdly low price, I’ve watched this little tool save hours of frustration on a single fireplace surround. Let’s take a deep dive into why the Simple Scribe deserves a permanent spot in your tool bag, how to wring every last bit of accuracy out of it, and where its limits lie.
The Problem the Simple Scribe Solves : Why Scribing Matters, and Why Most Methods Fall Short
Before we even touch the tool, let’s talk about the headache it cures. Scribing is the process of transferring the exact contour of one surface onto another piece of material so the two can fit together with a tight, gap‑free seam. You see it most often when installing baseboard on a floor that waves like the ocean, fitting a cabinet side panel to a wall that bows out, or trimming a countertop backsplash to follow a lumpy stone fireplace. Done right, scribing leaves you with a cut line that mirrors every dip and hump of the reference surface. Done wrong, you’ve got gaps you can throw a cat through, and you’re reaching for a tube of caulk that you’ll pray the client doesn’t notice.
The classic methods are legion : you can use a drafting compass, walking the metal point along the wall while the pencil marks the board. That works until the distance exceeds the compass’s reach or the point skips out of a rough mortar joint. You can use a scrap block and a pencil - the “washer trick” where you tape a washer to a pencil to set a fixed offset - but that’s fussy and the offset isn’t adjustable on the fly. You can buy a dedicated contour gauge, but those are for short sections and don’t give you a continuous cut line across a 16‑foot baseboard. You can even freehand it with a pencil riding your thumb as a guide, which is as reliable as a weather forecast for next month.
The Simple Scribe steps into this mess with an elegantly simple solution : a molded plastic body that provides seven flat reference surfaces, each precisely offset from the pencil centerline by a known distance - 1/4″, 3/8″, 1/2″, 5/8″, 3/4″, 7/8″, and 1″. You pick the offset that’s slightly larger than the largest gap you need to remove, run the tool’s flat face against the irregular surface, and the pencil draws a perfectly parallel line on your workpiece. No calipers, no trial and error, no eyeballing. It’s a one‑handed operation that leaves your other hand free to hold the board steady.
Unboxing the Genius : What Exactly Is the Simple Scribe?
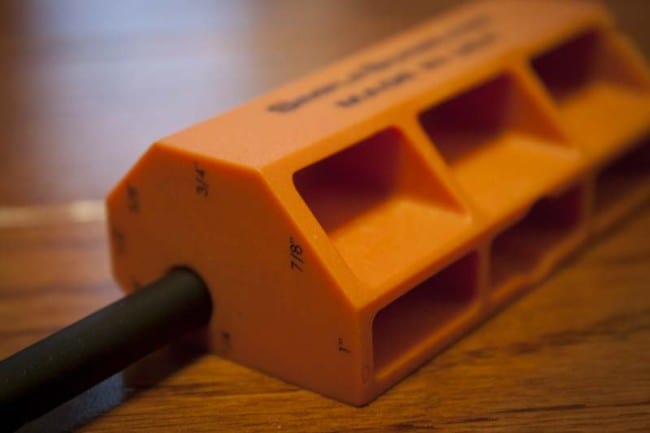
Pull the Simple Scribe out of its minimal packaging and you’re holding a piece of high‑impact plastic that weighs next to nothing. The body is a sort of asymmetrical polygon - a shape that looks odd until you realize every flat edge corresponds to one of the seven scribing distances. Flip it over, flip it around, and you’ve got a different offset ready to go. The distance markings - 1/4, 3/8, 1/2, 5/8, 3/4, 7/8, and 1 - are etched directly into the plastic, not printed on with ink that fades after a month bouncing around a tool bag. They’re easy to read, even in the low light under a kitchen cabinet, and they’ll remain legible for the life of the tool.
At the center of the body, a threaded hole accepts a standard round #2 pencil. You insert the pencil and twist it down until it seats firmly. The threads grip the pencil’s wood casing tightly enough that there is zero wobble - I’ve scribed long, aggressive strokes on rough‑sawn material and the pencil tip didn’t budge a fraction of a millimeter. That’s critical because any play at the pencil holder translates directly into an inaccurate line. Equally important, the pencil is locked in so securely that it absolutely will not fall out, even if you drop the tool or toss it into a tool bag unceremoniously. The downside of this rock‑solid grip is that sharpening must be done with the pencil in place; you’re not going to casually pull it out, sharpen it, and reinsert it without wearing down the threads over time. Once a pencil goes in, it’s better to treat it as semi‑permanent and sharpen from the outside until the stub is too short to use. At that point, you back it out, insert a fresh pencil, and you’re back in business. A standard #2 pencil costs pennies, so this isn’t exactly a financial burden.
Nestled into the plastic body is a small bubble level - a genuinely useful addition. When you’re scribing a line that needs to remain horizontal, like the bottom of a baseboard, you can check that the board is leveled before you scribe, or use the bubble to keep the tool itself roughly horizontal as you trace, minimizing any angular distortion. It’s a small detail that reveals Crochet’s carpenter brain at work : he knew you’d sometimes want a quick level reference without reaching for a separate tool.
The Offsets Explained : How the Shape Creates Seven Distances Without Any Moving Parts
The Simple Scribe achieves its seven distinct scribing offsets without a single adjustable screw, slider, or clamp. The secret is entirely in the geometry of the plastic body. The tool is essentially a flattened polygon; each side of that polygon presents a flat bearing surface at a different distance from the central pencil axis. To change offsets, you simply rotate the tool in your hand, select the side marked with the desired distance, and press that flat face against the reference surface. The built‑in bubble level remains functional in most orientations, another thoughtful touch.
Here’s the full offset table for quick reference:
| Offset Marking | Distance From Pencil Centerline | Best Used When Maximum Gap Is… |
|---|---|---|
| 1/4″ | 0.25 inches | Very tight fits; cabinet fillers against nearly flush walls |
| 3/8″ | 0.375 inches | Minor undulations in drywall or floor |
| 1/2″ | 0.5 inches | Common for baseboard on moderately uneven floors |
| 5/8″ | 0.625 inches | Older homes with settled floors |
| 3/4″ | 0.75 inches | Stone or brick fireplace surrounds; wider gaps |
| 7/8″ | 0.875 inches | Deep contours on rustic surfaces |
| 1″ | 1.0 inches | Maximum offset for heavily irregular edges |
The increment between each step is exactly 1/8″, which gives you a balanced spread across the most common scribing scenarios without overwhelming you with choices. In practice, you measure the widest gap between your workpiece and the reference surface, round up to the next available offset, and start scribing. The line you produce will sit exactly that offset distance away from the reference contour. After cutting along that line, the workpiece should theoretically kiss the uneven surface all the way along. In reality, you might need a light sanding or a tickle with a block plane, but the heavy lifting is done.
Where the Simple Scribe Shines : Real‑World Applications That Will Pay for the Tool on the First Job
Let’s move from theory to sawdust. I first reached for the Simple Scribe on a fireplace surround job - 1x material that needed to butt tightly against an irregular fieldstone hearth that looked like it had been laid by someone who’d never heard the word “level.” My usual method would involve a compass, a lot of bending, and a prayer. With the Simple Scribe, I measured the largest gap (just over 5/8″), set the tool to the 3/4″ face, and ran it along the stone in one continuous pass. The pencil line tracked every lump and hollow faithfully. After cutting to the line with a jigsaw, the board dropped into place with a gap so consistent that a bead of color‑matched caulk made it disappear entirely. That single scribe saved me at least 20 minutes of fiddle‑time compared to my old method. At my shop rate, the Simple Scribe paid for itself roughly six times over in that one hour.
Baseboard on Wavy Floors: If you install trim in homes older than about a week, you’ve met the wavy floor. The floor dips, the baseboard sits on the high spots, and gaps of 1/4″ to 3/4″ yawn along the bottom. Set the Simple Scribe to the offset that’s just larger than the deepest dip, place the baseboard face‑up on your sawhorses, run the tool along the floor’s edge while scribing the board, and cut. No shims, no guesswork, no cutting the baseboard too short and having to start over.
Paneling and Wainscoting: Installing vertical panels inside a closet or along a hallway where the walls are never perfectly plumb? The Simple Scribe lets you transfer the wall’s bow onto the panel edge. Hold the panel in place, set the offset to cover the largest gap, and scribe the panel to the wall. Because the tool’s body is only about as thick as a man’s wallet, you can often scribe without fully removing the panel - just hold it slightly away, scribe, and cut.
Cabinet Filler Strips: Those skinny strips that fill the gap between a cabinet and a wall are the bane of a cabinet installer’s existence. The wall is seldom flat, and you need a perfectly tight fit. The Simple Scribe handles filler strips beautifully. Clamp the filler to the cabinet face frame where it will live, run the tool against the wall, and you’ve got a cut line that matches every undulation.
Countertop Backsplashes: A stone or laminate backsplash that needs to follow a contoured wall, or a window sill with a wavy underside, can be scribed just as easily. The pencil marks the finish material, and a belt sander or coping saw removes the waste to the line.
Scribing to Brick, Stone, and Plaster: Rough, irregular surfaces are actually where the Simple Scribe performs best. The flat plastic face glides over mortar joints, stone edges, and textured plaster without catching, providing a smooth pencil line even when the reference surface would tear up a compass point.
Technique Matters : How to Get Perfect Scribe Lines Every Time
Even the simplest tool rewards good technique. After a few dozen scribe lines with the Simple Scribe, I’ve dialed in a workflow that minimizes error and maximizes consistency.
- Measure the Gap First: Always find the maximum distance between the workpiece and the reference surface. You can do this with a tape measure, a folding rule, or simply by holding the Simple Scribe against the gap and visually checking which offset just clears the widest point. Select the offset that’s equal to or slightly larger than that maximum gap. Never choose an offset smaller than the biggest gap, or your workpiece will bottom out before the scribe line is fully cut.
- Orient the Tool Consistently: Hold the Simple Scribe so the flat bearing face is flush against the reference surface, and the pencil tip touches the workpiece. Keep the tool perpendicular to the workpiece, not tilted. Tilting changes the effective offset distance. If you must tilt to clear an obstruction, do so consistently throughout the scribe.
- Maintain Even Pressure: Push the bearing face gently but firmly against the reference surface. Don’t bear down so hard that you flex the plastic body - it’s durable, but it’s not indestructible. Let the flat face follow the contour; don’t force it into depressions, or you’ll amplify the undulation on your workpiece.
- Scribe in One Smooth Pass When Possible: Start at one end, and with a steady hand, draw the tool along the full length in a single continuous motion. Stopping and starting can create tiny kinks in the line. On very long baseboards, it’s okay to scribe in sections, but blend the transitions carefully.
- Tight Spots? Get Creative: The Simple Scribe’s body is compact enough to fit into most spaces, but occasionally a corner or a tightly recessed area blocks full access. If you can get at least some purchase with the tool’s flat face - even a quarter‑inch - and maintain a consistent angle, you can still produce a usable scribe line. The trick is to never let the reference surface contact the pencil directly; always keep the plastic body as the intermediary. In truly impossible corners, you may need to freehand the last inch, but that’s a fraction of the run.
- Sharpen the Pencil Often: A dull pencil produces a thick, fuzzy line that introduces ambiguity. Keep the pencil point crisp. Since the pencil is locked in place, use a small handheld sharpener or a utility knife to re‑point it as you work.
The Bubble Level : A Small Detail That Solves a Big Headache
I’ve mentioned the integrated bubble level a couple of times now, and I want to give it its due. When you’re scribing the bottom of a baseboard, you typically want the board itself to be level - not necessarily parallel to the floor, because floors slope, but actually horizontally level - so that once installed, the top edge of the baseboard reads level to the eye, and the bottom reveals the floor’s character. The Simple Scribe’s bubble lets you check the board’s level as you position it and, if you’re careful, use the tool itself as a mini‑level while scribing. This dual functionality means you don’t need to grab your 4‑foot level just to check a 16‑inch run. It’s a thoughtful addition that costs nothing extra and adds genuine value, especially on quick punch‑list tasks.
Designed by a Carpenter, Made in the USA : The Story Behind the Tool
The Simple Scribe isn’t a product of a giant corporate R&D department. It was invented by Marty Crochet, a working carpenter who grew frustrated with the scribing tools available on the market - or the lack thereof. He wanted something that was faster than a compass, more adjustable than a washer taped to a pencil, and durable enough to live in a tool bag without shattering. So he designed it himself, prototyped it, and brought it to production. The tool is manufactured in the USA, which is increasingly rare for an accessory priced under $15. That domestic manufacturing matters because it means tighter quality control, shorter supply chains, and a product that supports skilled American jobs. It’s also a point of pride that I think resonates with the kind of professional who values craftsmanship in their tools as much as in their work.
Pricing That Makes Multi‑Tool Purchases a No‑Brainer
At $12.95 for a single unit, the Simple Scribe is already one of the most affordable precision layout tools you can buy. But the pricing structure gets even friendlier when you order multiples. The price drops to under $10 per tool when you pick up two or more. Why would you want more than one? For exactly the same reason you have multiple tape measures : you’ll keep one in your finish‑carpentry pouch, one on the miter saw station, one in the truck’s backup bag, and maybe you’ll gift one to the apprentice who’s been borrowing yours all week. At less than ten bucks for a tool that can easily save you half an hour of head‑scratching on a single job, the ROI is immediate and undeniable.
Here’s a quick cost analysis to put that into perspective:
- One Simple Scribe : $12.95
- Time saved per typical scribe‑heavy job (versus a compass) : conservatively 15 minutes
- Value of 15 minutes at a $60/hour shop rate : $15.00
- Number of jobs required to recoup the cost : one.
That’s the math that matters. This tool doesn’t just pay for itself; it generates profit from the very first time you use it.
Simple Scribe vs. The Alternatives : A Feature‑by‑Feature Comparison
To fully appreciate what the Simple Scribe brings to the table, let’s stack it against the other scribing methods you might currently use or consider buying.
| Method | Adjustable Offsets? | One‑Handed Operation? | Built‑In Level? | Durability in Tool Bag | Price (Approx.) |
|---|---|---|---|---|---|
| Simple Scribe | Yes, 7 preset distances (1/4″–1″) | Yes | Yes | Excellent (high‑impact plastic) | $12.95 |
| Drafting Compass | Infinitely variable within its range | No (two‑handed on rough surfaces) | No | Fragile; points bend | $5–$20 |
| Washer + Pencil “Trick” | No (fixed by washer size) | Yes | No | Jury‑rigged; washer can slip | ~$1 |
| Contour Gauge | N/A (transfers profile, not offset) | Typically two‑handed | No | Moderate (metal or plastic pins) | $10–$40 |
| Dedicated Cabinet Scribe (metal bar type) | Yes, usually with wing nut and slot | Often requires tightening | No | Can loosen over time | $15–$30 |
| Freehand Thumb‑As‑Guide | Your thumb width, maybe | Yes | No | Your thumb (replaceable) | Free |
The table reveals why the Simple Scribe has earned its reputation. It’s the only solution that combines rapid, preset adjustment with one‑handed operation and a built‑in level, all at a price point that doesn’t require a purchase‑order approval. The compass is more adjustable but far more finicky on rough surfaces; the metal bar scribe can work but often slips; the washer trick is free but maddeningly imprecise. The Simple Scribe hits the sweet spot for the working carpenter who needs to scribe a line and move on, without fussing with settings or worrying about the tool walking out of adjustment.
Limitations and Honest Criticism : What the Simple Scribe Won’t Do
No tool is perfect, and I refuse to write a review that glosses over the warts. The Simple Scribe’s strengths are real, but so are its boundaries, and potential buyers should understand them before clicking “add to cart.”
Tight, Recessed Areas: The plastic body has a certain thickness - roughly 3/8″ at its thinnest edge. If you’re trying to scribe into a corner where the reference surface is recessed less than that thickness, you won’t be able to get the tool’s flat face against it at the correct angle. In such cases, you’ll need to freehand the last little bit or switch to a thinner metal compass. This is a limitation of any body‑guided scribe tool, not a flaw unique to the Simple Scribe.
Fixed Offsets, No Infinity Adjustment: You have seven choices, period. If you need to scribe exactly 11/16″ because that’s the maximum gap and you don’t want to remove any extra material, you can’t dial that in. You’ll have to step up to the next increment (3/4″) and remove a bit more material. In practice, this extra 1/16″ is easily taken up by caulk, shims, or a light shave, but for hyper‑precise applications, a compass might give you finer control.
Plastic, Not Titanium: It’s durable plastic, but it will eventually break if you run it over with a truck or use it as a pry bar. Treat it with the same care you’d give a combination square or a marking gauge, and it will outlast your career.
Pencil‑Dependent: You must use the right pencil - a standard round #2. Hexagonal carpenter’s pencils won’t thread in. If you lose the pencil and somehow don’t have a spare #2, you’re temporarily out of business. Keep a few cheap pencils in your kit.
Despite these modest limitations, the Simple Scribe covers the vast majority of scribing tasks that finish carpenters, cabinet installers, and remodelers face daily. The edge cases where it falls short are exactly that - edge cases.
What Tradespeople Are Saying About the Simple Scribe
Nothing validates a tool like hearing from the people who swing a hammer for a living. I’ve gathered feedback from fellow carpenters who’ve adopted the Simple Scribe into their daily kit.
“I do a lot of historic renovations where nothing is square and no floor is level. I used to spend hours with a compass, adjusting it constantly. The Simple Scribe lets me set an offset once and run the whole room. At twelve bucks, I bought four - one for the shop, one for the truck, one for home, and one for the apprentice. Best money I’ve spent on a layout tool in years.”
– Terry B., Finish Carpenter, Savannah GA
“I’m a cabinetmaker, not a trim carpenter, but I use the Simple Scribe constantly for fitting fillers and scribing end panels to walls. The bubble level is a nice touch - I don’t have to walk back to the bench for my Stabila every time. It’s so simple that I almost didn’t buy it, thinking it was a gimmick. It’s not. It’s a real tool.”
– Kelly N., Cabinet Shop Owner, Portland OR
“I teach carpentry to high school students. The Simple Scribe is the first tool I hand them when we do baseboard. It teaches the concept of scribing without the frustration of a compass that keeps slipping. They get it immediately, and their cuts actually fit. For an educational setting, it’s perfect.”
– Marcus W., Construction Trades Instructor, St. Paul MN
Frequently Asked Questions About the Simple Scribe
Q : Can I use a mechanical pencil or a different writing instrument?
A : The Simple Scribe is designed specifically for a standard round #2 wooden pencil. The threads bite into the wood to create a tight lock. A mechanical pencil or a pen will not thread in or hold securely. Fortunately, #2 pencils are dirt cheap and universally available.
Q : How long does a pencil last when scribing?
A : Days of heavy use, honestly. Because you’re drawing a line, not shading a portrait, a single pencil can scribe hundreds of linear feet. Keep a sharpener handy to maintain a fine point, and you’ll get a surprising amount of mileage before the stub needs replacing.
Q : Is it really made in the USA?
A : Yes. The Simple Scribe is manufactured in the United States, which is a point of pride for the inventor and a guarantee of consistent quality.
Q : Will it work for left‑handed users?
A : Absolutely. The tool is symmetrical in function; it doesn’t care which hand you hold it in. The offset distances remain identical regardless of orientation.
Q : Can it scribe metal or concrete?
A : The pencil marks best on wood, drywall, and other paintable surfaces. You can use it to scribe onto metal if you swap the pencil for a soapstone marker of the correct diameter (not all will thread in), but that’s not its intended use and may damage the threads. For metal scribing, a dedicated metal scribe with a carbide tip is a better choice.
Q : Does the bubble level guarantee a level line?
A : The bubble level shows when the tool’s body is approximately horizontal. It’s a guide, not a precision instrument. For critical level lines, always verify with a quality spirit level or a laser. The bubble is most useful for keeping the board itself level while you scribe.
Final Verdict : The Simple Scribe Is the Best $12.95 You’ll Spend on Trim Work This Year
The Simple Scribe belongs to that rarest class of tools : a genuinely innovative, beautifully simple solution to a problem that has plagued woodworkers for centuries, priced so accessibly that there’s no rational excuse not to own one. It replaces a pocketful of jury‑rigged solutions with a single, durable, USA‑made piece of plastic that never needs batteries, never goes out of calibration, and never asks more of you than to pick an offset and draw a line.
If you’re a finish carpenter who regularly installs base, casing, crown, or paneling in anything other than brand‑new, laser‑straight construction, the Simple Scribe will pay you back on the very first job. If you’re a cabinet installer wrestling with filler strips and end panels, you’ll wonder how you ever lived without it. If you’re a DIYer tackling a single room of wainscoting at home, the tool will elevate your results from “not bad” to “how did you get that to fit so perfectly?”
At $12.95 - or less than $10 each when you buy two - there is almost no financial risk. Buy one, toss it in your tool pouch, and the next time you’re staring down a wavy floor or a crooked wall, you’ll reach for it and smile. That’s the promise of a simple tool done right. The Simple Scribe delivers.
Comments 0
Leave a Comment